


A mommy and me, easy and fun kids’ project, that you and your kids will love making together. This “Bunny Door Greeter” is wonderful to give to a grandparent or for your own front door. It’s also a good project that kids can do in their classroom and can be done with any animal’s face with ears and whiskers. As a grandparent, I would love to hang this up on my front door, knowing my grandson had made it, just for me. (<;
HERE’S WHAT YOU’LL NEED
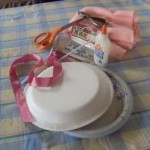
- 2 Paper plates
- 26″ x 1″ Satin ribbon-pink
- 2 Squares pink felt or 1/4 yd.
- 1 Square white felt
- 2 White pompoms
- 1 Pink pompom
- 2 White chenille stems
- 2 Movable eyes, medium or large
- Couple stalks of flowers
- Craft glue
- Piece of paper
- Stapler
- Scissors
- Ruler
HERE’S WHERE TO GET IT
First check your own house, and sewing room, you might already have what you need! But if you don’t, a craft or sewing store will be able to help you out.
HERE’S HOW TO MAKE IT
- Cut ribbon. One 20″ for the strap and the remainder will be 6″ for the bow.
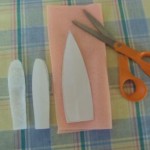
- Cut chenille stems. 4, 3″ and 2, 2″. Cut the last piece in half which will be used in between the felt ear pieces.
- Cut 2 large ears 7″ and 2 small ears 5″ long. To do this, draw one large ear from a piece of paper as a template. Fold the piece of paper in half and draw the large ear on one side of the paper, cut it out and open the paper to get the full ear template. Place it on the pink felt and cut out two. Take that same paper template, fold it in half again and cut it 1/4″ smaller all the way around and open it to get the full paper template. Cut the smaller ear from the white felt.
- Glue the 2 remainder chenille stems between and in the middle of the felt ears, 1/2″ up from bottom of ear. Glue all the way around the white ear and place it on top of the pink ears, encasing the chenille stems inside. Let dry.
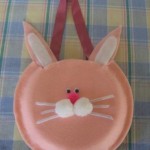
- Staple the two paper plates together around the edges.
- Cut a 5″ horizontal piece off the top of both paper plates. Cut to top of round edge of plate.
- Staple ears to front of paper plate at edges of opening.
- Glue the pink felt square over the front paper plate and cut away the felt at plate opening when dry.
- Staple the 20″ piece of ribbon to the back of the paper plate at edges, making a loop hanger.
- Glue the two eyes 2 1/2″ down from the top of the cut away plate, in the center.
- Glue the pink pompom, nose, under the eyes. The chenille stems, whiskers, (3 on each side, with small one in center) under nose to either side, and the white pompoms under the pink nose on top of chenille stems. Let dry.
- Tie the remainder of the ribbon into a bow and glue to bottom of plate, in center. Let dry.
Tip: You can also use cotton balls for cheeks instead of white pompoms and blanket batting for white centers of the ears. If using fresh flowers, stick them into green floral foam that has been cut to size and soaked in water for 30 minutes. Place them in a zip lock bag, zip as far as you can around the flowers before placing them in between the paper plates.
By: YLE Crafty Chic, Sharon Tittle


No Responses to “{Kids} DIY Craft: Easter Bunny Door Greeter”