What makes an apron too cute for words? I say, it’s the fabulous fabric. From vintage chic to cool chic, there’s nothing like a personalized apron and pot holder to match your sense of style. Get your 50’s homemaker vibe on in no time with this apron that you can make in one afternoon and be ready to wear it that night while making dinner. My favorite local place to buy fabrics is Rosie’s Calico Cupboard Quilt Shop and it’s almost as fun shopping there as it is making the apron!
Here is a pdf of the illustrated instructions: 20100420134219018
MATERIALS YOU’LL NEED
- 1 yd. Fabric (for apron)
- 1/8 yd. Cotton flannel (for pot holder)
- 1 Pkg. Rick Rack (contrasting color)
- 1 Pkg. Wide bias tape ( same contrasting color)
- Thread
- Scissors
- Measuring tape
- Iron
HERE’S WHAT YOU’LL DO FIRST
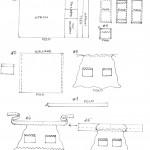
All pattern pieces are based on fabric that is doubled. See diagram #1 for pattern layout.
- Measure and cut a 15″ x 24″ square of fabric, for body of apron. Measure 24″ on folded edge.
- Measure and cut out 2 strips of fabric for apron ties, 3″ wide at fold, the width of the fabric.
- Measure and cut 2 squares for pockets, 6″ long x 7″ wide, on salvage edge.
- Measure and cut out 1 square for pot holders, 7″ wide x 10″ long. Cut open fold. Same measurements for doubled cotton flannel.
HERE’S HOW TO MAKE IT
Apron:
- Pocket; Diagram #2. Fold down top 1″ to wrong side of material, iron and pin. Pin and sew Rick Rack horizontally on right side of folded material, 1/2″ down. Fold and iron the other 3 sides of the pocket 1/4″.
- Open the 15″ x 24″ square of material to 1 ply. Diagram #3. Sew pockets to right side of material, 6″ from the top, all the way around the edge of the pockets. Place pockets where you’re hands naturally would go into a pocket.
- Also diagram #2. Fold the 15″ x 24″ piece of material in half with right sides together, and sew down each side. Clip corners. Turn inside out and iron.
- Diagram #3. Using you’re machines longest stitch, sew a basting stitch 3/8″ from the top edge, leaving a long tail of thread at the end. Pull the top thread carefully, loosely gathering into a slight ruffle.
- Diagram #4. Sew one end of the 2 strips together and iron seam open. Iron the strips in half, lengthwise.
- With right sides together, center and pin gathered apron to straps and sew together.
- Diagram #5 & 6. Fold and iron straps in half and fold edge of strap over 1/4″. Pin strap together over apron and starting at one end of the strap, top stitch the strap closed, stitching close to the bottom edge.
- Diagram #6. Sew Rick Rack horizontally, 2″ from bottom edge, across apron.
Pot Holders:
Makes 2;
- Diagram #1. Pin cotton flannel inside of each piece of material to wrong side, stitch close to edge all the way around. Trim flannel close to stitch.
- Diagram #2. Pin and sew Rick Rack 2″ from top and bottom, to right side of material.
- Diagram #3. Fold material in half with flannel facing in, Rick Rack on outside of material. Iron.
- Diagram #4. Open bias tape up and place pot holder inside. Pin and sew wide bias tape all the way around, leaving 3″ of tape at the end, at corner, to loop over and tuck into the last couple stitches to close.
By: YLE Crafty Chic, Sharon Tittle


No Responses to “{Nesting} DIY Craft: Apron and Pot Holders”